Cryptocurrencies are becoming mainstream, and a major part of this industry is NFTs. Many popular artists and celebrities get involved in this new world, creating NFT projects all over the internet.
But their fame is just a “marketing plus,” as many unknown people started from scratch, creating NFT artworks (or different kinds of NFTs) and profiting from it. Some ended up becoming rich. The best part is that you can make it without investing money.
That’s what we will talk about: how you can make your own NFT free of gas fees and additional expenses and how to use alternative blockchains without diminishing your project. You can end up being successful as all the rest and for free.
What is an NFT
Let’s start with the basics. “NFT” stands for “Non-Fungible Tokens.” These are data units that are stored inside a blockchain. What is it exactly? Blockchains are digital records or blocks that are locked in with each other, thanks to the use of cryptology.
NFTs are permanent data units that can not be changed once locked. It can’t have an exchange without equal substitution. You can’t have more of the same NFT, and you can’t copy it, as they are completely unique (unlike cryptocurrencies, which can be millions of the same crypto around the world).
That uniqueness is what gives NFTs value. For example, if your NFT artwork collection becomes popular among users and has a limited NFT supply, its value will automatically increase due to its demand. It is a technology that gives artists power over their digital artworks, with the aspiration to become as valuable as traditional art someday. Some NFTs have already reached that goal.
Choose Your Preferred Format for Your NFT Collection
We mentioned “NFT artwork,” but there are plenty of different formats to create an NFT. You can make an NFT from a video, an audio clip, a GIF, a meme, etc.
Currently, artworks and images are the most popular among all. But you will find a successful project for every format people think of, like the “NBA Top Shots” in GIF format or the “Kings of Leon” music album you can purchase as an NFT.
What Blockchain Should I Choose
An NFT can be stored on more than one blockchain. It will keep track of the permanent record of your NFT, and choosing the right one that fits your needs is important.
Let’s check some of the most popular blockchains around the market, with their advantages and disadvantages to your NFT creation.
Ethereum
There are many NFT collections (thousands, one might say) in the Ethereum blockchain, the most popular NFT network of all.
NFTs are stored on the blockchain via the ERC-721 token standard. Developed by the ERC-20 smart contract, it defines the minimum interface for distributing and exchanging tokens. This will include ownership details, security details, and metadata (which is required for distributing and exchanging such tokens).
Being the most popular blockchain around comes with two problems. The first one is that you will be paying gas fees every time you have to do a transaction on the Ethereum blockchain. This gas fee can escalate pretty quickly and high if you want to do a transaction at high-traffic daytimes. It is not fixed, so you must play around with that issue.
Polygon
If the drawbacks of the Ethereum blockchain are too much for you, don’t worry because there are alternatives. This is when the Polygon blockchain comes into action.
Polygon is a Layer 2 solution and the best alternative to launching your smart contract outside the Ethereum network. And why is that? Because it doesn’t pay gas fees if you list it on the OpenSea marketplace. It is more environmentally friendly than ETH, allowing you to mint NFTs for free. The only trade you have to pay is visibility, as no other network is as popular as Ethereum.
Solana
If you want to look for more options, we can also recommend the Solana blockchain. If you aren’t convinced by Polygon or want to broaden your options, Solana is next in line.
It is made to be cheaper and faster than Ethereum. Gas fees are less than $0.01, and the number of apps supporting NFTs on this blockchain is growing. Solana uses “proof-of-stake” (PoS) and “proof-of-history” (PoH) consensus mechanisms, which make transaction speeds much faster than the ones with ETH.
What is a Crypto Wallet
These digital wallets act as identity cards to claim ownership over blockchain data units and login into many blockchain-based websites. To be clear, wallets don’t properly store cryptocurrency or NFTs. These crypto wallets can be web apps, browser extensions, mobile apps, and even physical devices. They are usually used to store encrypted keys that will enable you to access cryptocurrencies and decentralized financial applications. You can receive and send digital assets (like crypto and NFTs) with these wallets.
For these very reasons, it is important to understand how a crypto wallet works, as it will be another important part of making your own NFT. We will take a look at how you have to set up your wallet on two of the most popular and trustworthy wallets around MetaMask and Coinbase.
How to Setup a MetaMask Wallet
MetaMask is the most accepted cryptocurrency wallet in the world, as it works with many blockchain networks, and most of the NFT platforms and crypto projects support it.
First, you must add the MetaMask extension to your Chrome browser. Find it on the Chrome Web Store page and click “Add to Chrome.” Make sure you are using Google Chrome or any other of the chromium based-browsers.
Once that is set, let’s continue setting up your wallet:
- Once the extension is installed, a new web page will pop up welcoming you to MetaMask. Click on “Get Started.”
- Choose the option “Create a Wallet.”
- It will ask you to create a password. Check the “terms of use” box and click “Create.”
- The next page will explain the “Secret Recovery Phrase.” In short, it is a 12-word phrase that acts as a “master key” to your wallet and funds. Keep it safe; it is very important to recover your wallet or import it into another device.
- Once you click “Next,” you will see a box for your recovery phrase. Most of them are random words. Save it, don’t show it to anyone, and keep it safe.
- Finally, you will be greeted with your wallet dashboard. It is ready to mint NFT and store crypto.
How to Setup a Coinbase Wallet

Another well-renowned digital wallet is Coinbase. If you are looking for an alternative to MetaMask, Coinbase is the one that follows it.
This is how you create your own wallet:
- Go to the Coinbase website and click on “Get Started.”
- A form will pop up asking you for your first and last name, email address, and password. Check on the age certification and then on “Create Account.”
- A verification email will be sent to you at the address you wrote previously. Click on the verification, and your account is ready to use.
- Go back to the Coinbase website and login into your account.
- Under the “Assets” tab, click “Get Wallet.”
- It will prompt you to install the Coinbase Wallet browser extension. To continue, select “Add to Chrome” (if you are using Google Chrome).
- Open the extension once it is installed, and select “Create New Wallet.”
- Like on MetaMask, it will give you a secret recovery phrase.
- Follow the instructions, and it’s done! You can use the Coinbase Wallet to store crypto and for NFT minting.
NFT Marketplaces
There are a lot of platforms for NFT creators to sell NFTs and their blockchain projects, but it would be nearly impossible to cover them all concisely. But we will highlight some of the ones that stand out above the rest.
OpenSea
OpenSea is the most popular NFT marketplace and is easy to use for all types of NFTs. It supports a wide range of blockchain networks, including Ethereum, Polygon, Solana, Avalanche, and more.
OpenSea has the “lazy minting” feature that allows you to create NFTs for free and pay the gas fees after you sell your NFT art.
But there is a way of free minting without paying gas fees with the Polygon blockchain, which we will see in detail later.
Rarible
Rarible is a community-owned NFT platform where the people that own ERC-20 RARI tokens can participate in the decision-making process for the project. It is also the second to come following the popularity of OpenSea.
It is a good alternative to create your first NFT in the format you like. It has some fun features, like allowing users that come to Rarible to “sneak peek” your NFT created but limiting the full project for those who purchase it.
It supports the Ethereum blockchain, Flow, and Tezos. It also has the “lazy minting” feature like OpenSea.
Holaplex
It is Solana’s NFT marketplace. We already talked about the benefits of using the Solana blockchain. It is very fast, has high performance, and is very cost-effective with very low fees.
Solana’s efficiency also cuts down the high energy usage compared with other blockchains, gaining a favorable reputation as a new and less environmentally damaging alternative.
To use Holaplex, you must create and set up a Phantom or Arconnect wallet.
Objekt
Objekt also allows NFT creators and artists to mint NFTs directly in their marketplace. It works only with the Tezos blockchain.
Objekt became popular among literary NFT creators, used by the popular theVerseVerse co-founders’ Ana María Caballero and Sasha Stiles.
You can use compatible wallets like Spire, Temple Wallet, Umami, Kukai Wallet, Galleon, and AirGap Wallet.
Time to Mint Your NFT
The minting process for an NFT is publishing a unique digital asset on a blockchain. Only doing this process doesn’t mean that it can be bought, sold, or traded. But it will get you ready to sell it.
A popular minting process over the last months was “lazy minting,” It is one of the best ways to mint NFTs for free.
Lazy Minting
Let’s state something from the beginning. Lazy minting won’t release you from paying gas fees. Although, more than paying a gas fee is not receiving part of your selling price.
With lazy minting, the buyer is the one who will pay the gas fee at the time of the purchase. The process is similar to regular minting NFTs. It is a great option if you want to create your NFT project in the Ethereum network to avoid paying high gas fees beforehand.
How to Mint on Rarible For Free (Step-by-step)
The first thing you need to do is create an account on the Rarible website. Once you are there, this is how you do it:
- Click on the “Connect Wallet” tab at the top right corner.
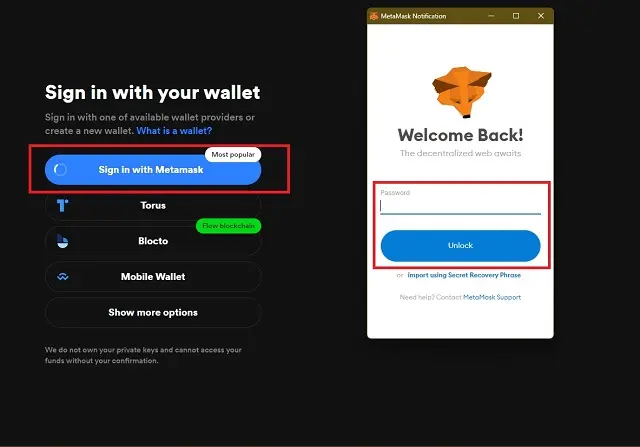
- Rarible will ask you which crypto wallet you are going to use to access the website. Choose any of your wallets.
- Once you select it, your wallet extension will ask you to introduce your password. Enter your password and select “Unlock.”
- A pop-up window will request your login confirmation. You must choose your account and click on “Next.”
- Click on the “Connect” button to complete the website login process, and you are ready to mint your first NFT!
But it is not over yet. We have our Rarible account and our wallet. Now is the time to properly turn our project into an NFT.
- Once your wallet is connected, Rarible will take you to a page where you can choose either an NFT collection or a single NFT.
- Select the one you are prone to make (for your first time, go for “Single NFT”).

- Here, you will upload your work. Of course, you need to have it done and ready at this point. Click on “Pick File” and upload the media file.
- Next, you can adjust the price at which you want to sell your NFT. You can choose among many options, like holding an auction. Also, choose the coin you want to accept for your NFT, and list it to the marketplace.
- After you have gone through all these options, you can select “Free Minting.”
- Next, you can add more details about your NFT (name, description, royalties, etc.).
- Once this is done, you will receive a pop-up notifying you that the NFT is in the creation process. Meanwhile, Rarible will establish a smart contract with your wallet to register the NFT. Whenever this contract appears in your wallet, click on “Sign.”
- Now it is done! You have minted and created your first NFT!
How to Create NFT on Polygon Blockchain For Free Using OpenSea (Step-by-step)
Now, let’s go with the second option to create an NFT for free. This time, we will be using the Polygon-Matic blockchain.
It is superior to creating an Ethereum NFT thanks to its higher transfer rate and low fees. It also works with all types of blockchain networks. Polygon is very simple for creating, buying, and trading NFTs.
Polygon became very useful for giveaways and those who want to create their first NFT. The MATIC token value has maintained stability even during crypto crashes. And using the Polygon blockchain eliminates the minting fees, with users not required to pay any transaction fees.
So, how can I create an NFT for free using Polygon? The first thing you need to do is to set up your digital wallet, and we will use MetaMask as an example. The issue is that MetaMask accounts operate with Ethereum by default. So, we will need to adjust our wallet to add the Polygon Network to our MetaMask wallet account and work with it. This will not affect your security at all.
Here is how you do it:
- Open the MetaMask browser extension by clicking on its icon. It is usually at the top right corner of your browser window or the extension’s menu if you can’t find it.
- Type your password to unlock your wallet. Click on the “Ethereum Mainnet” option located in the upper-right corner. Go to the menu and select “Add Network.”
- The dashboard will appear on a new tab. Then, the extension will ask you to write down the new network information. This is what you will need to put in:
| Network Name | Polygon |
| New RPC URL | https://polygon-rpc.com |
| Chain ID | 137 |
| Currency Symbol | MATIC |
| Block Explorer URL: | https://polygonscan.com/ |
Once you have introduced this information, click on the “Save” button, and you are done! You have successfully added the Polygon Network to your MetaMask wallet. Now, let’s proceed to an NFT marketplace that accepts it. In this case, we are going to use OpenSea.
Like on Rarible, the very first thing you have to do is to create a new account on OpenSea. And the process is very similar:
- With the MetaMask browser application already launched, go to the OpenSea main page and click on the “Create” button in the upper-right corner.
- It will prompt you to select a wallet for registration. You will select “MetaMask,” and the wallet extension will request your permission.
- Click on the “Next” button and select the “Sign” option.
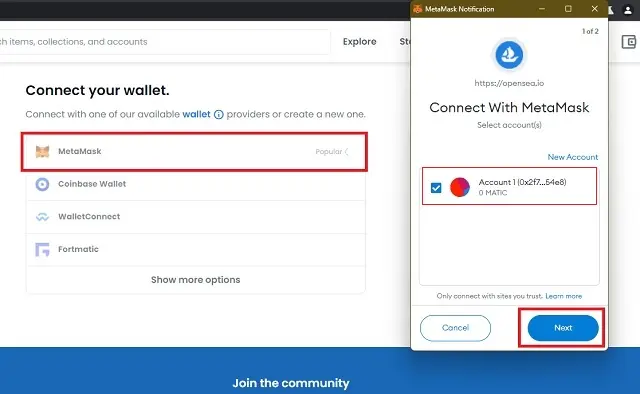
- Check that your Polygon account is displayed in place of the Ethereum account. Otherwise, you can easily switch to Polygon if the MetaMask wallet extension is still on Ethereum.
- To do this, select the wallet extension of the “Ethereum Mainnet” option. A drop-down menu will appear with the Polygon network. Click on the name of the network, and it is done!
With your OpenSea account created and your wallet connected, let’s proceed with the creation of your NFT.
- Once your account is ready, OpenSea will invite you to upload your media file (the one that contains your work). To upload it, click the empty box next to the upload option.
- After entering the details, scroll down to the bottom of the page, and choose “Polygon” from the drop-down menu under the blockchain section.

- Then, save your NFT and click on “Create.”
- Once the NFT is prepared, you can list it in the marketplace by clicking the “Sell” button.
- You can list the item’s price on ETH inside the listing dashboard.
- After finishing the remaining entries, click on “Complete Listing” from the menu.
- OpenSea will require you to sign a contract and approve the transaction. You won’t be paying anything for either of these.
- Then, a MetaMask pop-up will appear. Click on the “Unlock” button and next click on the “Approve” button.
- Select “Sign” on OpenSea and click “Sign” from the MetaMask pop-up menu.
Once all of these tasks are done, your NFT will be immediately listed for sale on OpenSea, with the price you tagged on the NFT and the time you created it.
Closing Thoughts
NFTs have the potential to benefit people from everywhere and from many different industries, whether you are an artist or a business person. With the possibility of creating NFTs for free, you will unlock many opportunities in the crypto industry, as cryptocurrencies are here to stay with an ever-growing demand for them.
Keep practicing caution to avoid unwanted losses. Blockchain technology might be new, but it still revolves around finance. As for the artistic side of NFTs, your only limitation is your imagination and creativity, as people are eager to see new things revolving around NFTs.